
Route66/Shutterstock
We may receive a commission on purchases made from links.
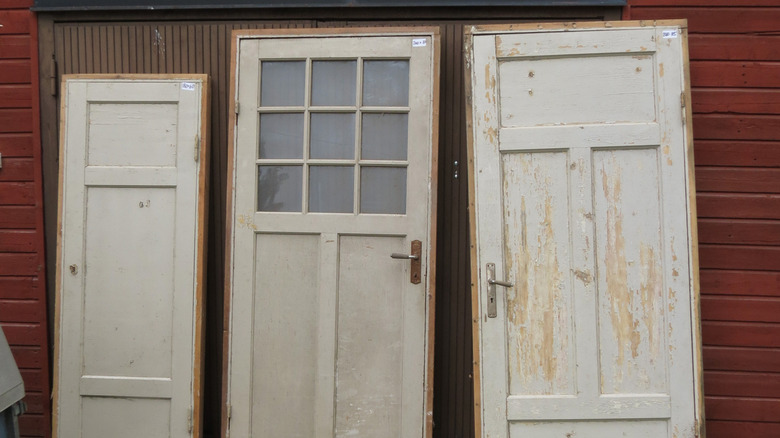
Shopping for new patio furniture can be a real hassle, and it can get expensive if you want something a little different. Why not skip all the boring, mass-produced patio tables and make your own instead? Now, before you start stressing about measuring, sawing, and finding the right wood, hold up – this project is way easier than you might think. All you need to do is visit a thrift store or two and find an old door that grabs your attention. Heck, you might even have one hiding in the back of your shed that you totally forgot about. Believe it or not, a character-filled timber door makes a gorgeous tabletop that’s sure to be the talk of the town when you’re entertaining family and friends.
The only other things you’ll need are materials for the base. You can either make that yourself if you’re handy with the tools, or you can hunt around for a pre-loved table that’s the right size but is either missing the top or looking a little sad and unloved. This is also the perfect way to give an old piece of furniture a new lease on life.
How to make your bespoke patio table using an old door

If you’ve got your hands on a base with legs that’s already assembled, all you really have to do is cut the door to size if needed, then attach it to the base and give it a lick of paint or a nice stain. But if you’re going to build the base from scratch, the first thing you’ll need is four sturdy legs. You should be able to find these at your local hardware or timber store. If they’re not quite the right height, you may need to trim them down a bit. To attach the legs to the door, start by gluing them on. If your door is painted, make sure to sand down the areas where the legs will go first – this will help the glue really grip. Once the glue has dried, use some screws to secure the legs in place and make sure they’re nice and sturdy.
Next, you’ll want to reinforce the whole base by adding some 1-by-4-inch rails in between the legs. To do this, turn the table upside down so it’s resting on the door, measure the four sides in between the legs, and cut your timber pieces to size. Glue these rails in place, making sure to sand the painted areas of the door first. If you’ve got a handy nail gun, you can now nail the door to the rails to hold everything together tightly. You might even want to add some braces underneath in the corners for extra stability.
Finishing your new patio table

Fauzi Muda/Getty Images
Now that your table is all put together, it’s time to give it the finishing touches. First, you’ll want to fill in any nail holes on the tabletop using some wood filler or a similar product to hide those pesky nails. Once the filler has dried, give it a quick sand to create a nice, smooth finish. Depending on how you want your tabletop to look, you might want to give the whole thing a light sanding too.
Finally, you can either paint your completed table or give it a nice stain. The choice is yours, but just keep in mind that if your table is going to be left out in the elements, you’ll want to use a waterproof stain or paint. The same goes for the wood filler you used. If you’re feeling a little more creative, you could even try giving your table a distressed look by applying paint or stain and then sanding in certain areas to make it look a bit worn and vintage.
While this is just one way to turn an old door into a patio table, there are plenty of other options too. For instance, you could use some simple sawhorses as the base and figure out how to attach the door to those. Really, as long as you’ve got that awesome old door for the tabletop, the possibilities are endless. All it takes is a bit of imagination and a trip or two to the thrift store, and you’ll have a one-of-a-kind masterpiece in your backyard that’s sure to be the talk of the town when you’re entertaining. And if you happen to find more than one door you love, you can always breathe new life into another one of them too.


